
So once again its been a while between blog posts but I am determined this time to continue on with blogging about all sorts of things - not much business wise as I've decided to take a small break from my business for a month or two or three to concentrate on everything else that has been happening in our lives and what is still to come over the coming months.
Since my last blog post my 3 little people have all celebrated birthday's and now they are 7, 5 and 3 - how time is flying!!!


We have also made a huge decision to move back into town - buying a block that will put us inner city living. It will fantastic not having to drive into town sometimes 2 or 3 times a day. We will be able to walk everywhere now - just a few hundred metres from school, a short walk to kinder and the town centre not even 15 minutes walk away.

Just under 800m2 and a odd shape with all sorts of easements around it, has made it tricky to find a house plan big enough to accommodate a family of 5, but we finally found a builder and plan which we have modified slightly to suit us. Once bonus is that it is in a quiet court overlooking a park, so what we will loose in backyard space, we will have little traffic coming in and a beautiful park to play and picnic in. And we are definitely putting in a pool with the build - so we are excited!
 roughly how the front/back of house will look
rough guide of how the ground floor will be (still waiting on the official plans).
upstairs will be 4 bedrooms, 2 bathrooms and a huge retreat area for the kids.
As far as business goes, I am still doing a little creating - but mostly just for me for once. I've decided to put the business on hold to create time for the more important things in life right now - which is my family and everything we have going on.
I've also decided to go back to University this year and am studying to be a Librarian through online learning part time. My plan is to have my qualifications completed to Diploma level by the time Mister 3 starts school (most likely sooner) and then find some part-time employment in a library as a library technician, while I continue on with my Bachelor degree qualification to a fully qualified Librarian. I'm enjoying studying and getting my brain working again on something different.
So stay tuned for more regular blog posts about all sorts of things; my family, building our new home, what crafty things I am making, tutorials I am happy to share about how to create small craft projects, recipes (as I've just purchased myself a thermomix this week and can't wait for it to arrive!) and anything else that takes my fancy.
Thanks for reading x
 Where to buy Wool Felt? I have a supplier that I have been buying my wool felt from for almost 3 years now. The quality of the wool felt and the customer service is fantastic - store link
  Step 2: Lay your smaller piece of felt with the marking on top of your inner layer piece of felt in the middle, and lining up the bottom edge, and sew 1/4 inch in from the edge along the bottom edges, to secure these two pieces of felt together, sewing back a few stitches at the beginning and end to secure your stitches.
 Step 3: Sewing your crayon pockets - starting at your first marking, sew from your bottom sewn line up to the top edge of your small piece of felt, sewing back a few stitches at the beginning and end to secure your stitches. Then move on to your next marking and do the same - until your have sewn up from all your markings and have 8 little pockets for your crayons.
 Step 4: Lay this sewn section on top of your outer layer of felt and sew all the way around the edge using a 1/4 seam allowance and leaving a small opening at one end of approx. 1/2 inch.
 -----------------------------------------------------------------------


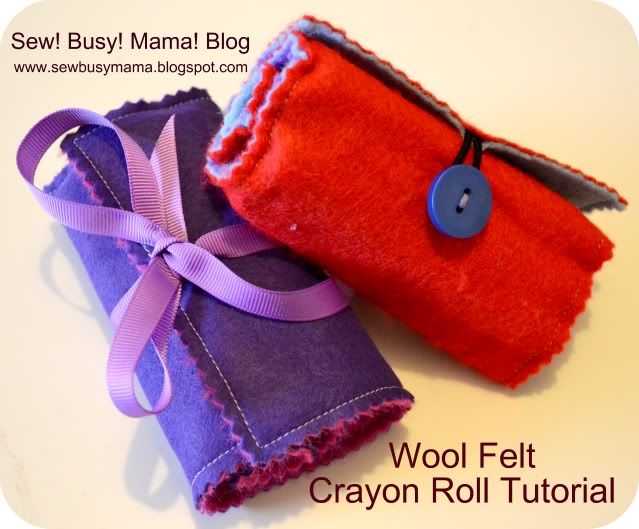
 Step 7: Fill the roll with your 8 crayons and roll up. Pull your elastic tie a little to find the right spot to sew on your button to the back of the crayon roll and pop a small mark here with your fabric pencil. Unroll and hand sew your button on being careful not to sew through your pocket layer of felt on the inside of the roll. Roll up your crayon roll and loop your elastic over the button to secure.
 Your finished! Well done! Any questions with this tutorial please do not hestiate to ask : )