Tuesday, December 13, 2011

{eb dolls quilt swap 2011} what I sent . . .

Yesterday Helen opened her package I sent her for the dolls quilt swap this year, and thankfully she loves it : )
I was really stuck as to what to make for Helen, as she is certainly an accomplished quilter and make some gorgeous quilts!
But I went with something different to challenge myself, tiny 1 inch squares and swirly quilting.
Its not perfect, but certainly very fresh and crisp and colourful!

Friday, December 2, 2011

{eb dolls quilt swap 2011} what I received . . .

A massive thankyou to Car for the stunning quilt she sent me for this years swap.
She seemed to know exactly what I would love.
Its perfect, very me.
And it will be a wonderful addition to my sewing room wall with the quilts from previous years swaps.
Thankyou Car x

{all grown up} Master T

This week Master T graduated from Kinder and is off to big school next year as a Prep.
It's a sad and a happy time - sad that he is growing up too fast which tells me I must be getting old! Happy that he is on to the next adventure in his life.
It also means I'm back to just two little ones at home with me, maybe a little bit more sewing time . . . ?

Thursday, December 1, 2011

{cubby house progress}

My hubby has been busy over the past few weekends building a fort/cubby house for the 3 little ones. And oh my goodness, he is doing very well! For someone with the use of only one good hand, he's gone from diesel mechanic to desk bound to cubby house builder extraordinaire!
Still a few finishing up jobs to go, like the roof - and then my job of 'fitting out' this monster play area for the kids with curtains, bunting, table and chairs and a kitchen according to Miss M!
More progress pics to come as Miss M & I make a decision on the curtain fabrics . . .

Wednesday, November 30, 2011

EB Dolls Quilt Swap 2011 - Sneak Peak : )

Sneaking back into my blog, its been a while between posts, but I'm back and ready to blog again.

That stuff called time has been hard to come by these past few months, but I've done a little quilting these past few weeks in between the chaos of my little business that has grown these past 6 months in a way that I couldn't have imagined in such a short space of time, kinder runs and graduation day for Master T, dance classes for Miss M, the fast growing and into everything Master N and the dreaded housework, plus gardening, cubby house building, and of course markets markets markets! More on all this and more in coming blog posts!
A little spot of quilting has been achieved, I think the first time this year . . . and here's a peak, in the post tomorrow for the talented quilter that it is off too, I hope she loves it : )

Wednesday, July 27, 2011

Collaborate for a Cause . . . raising money for the RFDS

For those who haven't heard about Collaborate for a Cause yet, please pop on over to the Facebook page and become a fan and spend some time going through the auction album. So many amazing handmadies have come together and collaborated to produce some amazing items up for auction.

I have collaborated together with Pink Apple and 4 Little Babushkas to bring to the auction this item below. A one of a kind ruffle front dress (prehaps something new for the summer collection) with matching accessories by Pink Apple & 4 Little Babushkas. We are donating our winning bid to the Royal Flying Doctors Service - a charity that is close to my heart.
Hubby and I come from a mining background. We met in Kalgoorlie, WA when we were both working in the mines, myself as a heavy machine operator - trucks, graders, loaders & water tankers - yes little old me was driving those massive machines, and hubby was a heavy duty diesel mechanic. As fate would have it we both drove into town on the same day - me from Victoria and him from Tasmania and ended up booking into the same caravan park, right across from each other! Friendships were formed and love blossomed. A few years later we made the move back to my home town, me pregnant with Tom : )

Hubby continued working in the mines, driving in and out from a site north of home in outback NSW. One horrible day that still sticks me everytime I visit my hairdresser bought our world crashing to a halt. When Tom was just 4 months old, and hubby was working away, I took a much needed visit to the hairdresser while my mum looked after little Tom. I received a phone call right towards the end of my appointment from hubby's boss to say there had been an accident on site and that they were waiting for the flying doctor to arrive to assess the injury. I was numb. No-one could tell me what was happening, how bad the injury was, or whether they were planning to fly him to Adelaide, Melbourne or Sydney. So we waited.

Two hours later, with the car packed and Tom and my mum with me we headed to Adelaide and arrived late in the night, with hubby already in surgery and nothing we could do but wait until morning.

Walking in the hospital ward and seeing him still haunts me. So many doctors I couldn't count them all on my fingers. Hubby suffered a severe crush injury - it turns out 3 tonne of heavy machinery doesn't agree with landing on the human body.

Thankfully hubby's injuries were something he can live with and we will always be grateful for the RFDS for saving his life x

So please, pop on over the auction album and if you can, show your support for this cause. There are so many amazing charities that could all do with the support x

Tuesday, July 26, 2011

Back to blogging . . . again!

I am a terrible blogger. I have so many posts on my list (yes I am list girl!) to write and I just can't seem to find the time to sit at the computer for long enough to get posting!

I am slowly putting together a new trans-seasonal collection for boys and girls for my label tillytom as well as the day to day chaos that comes with my 3 little cherubs at home with me all day. You can visit my facebook page for photos of what i have coming up, some available now, some in the next few weeks.

Sickness has come and gone and come again in our house over the past month and I am looking forward to warmer weather, spring, summer and more!

So, here I am . . . back to blogging . . . again : )

Tuesday, June 14, 2011

{Kids in the Kitchen} The Vegetable Mission #1 - Pumpkin Chocolate Cupcakes

This is the beginning of (hopefully) a regular Tuesday blog post from me. My children rarely (ok, they don't) eat vegetables, with the exception of little Nate who most of the time will eat anything and everything in site, including non-food items ; )


So I am on a Mission.

To get those vegies in disguise, to wiggle their way into some old and new recipes, and put food on the children's plates that they WILL eat, that they WILL enjoy and that they WILL ask for more of!


So what have I baked today and did I succeed! Pumpkin Chocolate cupcakes is on the menu today for morning tea - but did they eat them??? Continue reading to find out if they did!


Pumpkin Chocolate Cupcakes

1/2 cup SR Flour

1/2 cup White Sugar

1/4 cup Milk

1 egg

1/2 tblspn vanilla essence

1 1/2 tblspn butter

2 tblspn cocoa

1/2 cup cooked Pumpkin (steamed and mashed)


This will make approx. 12 mini cupcakes. If you want to make more, just double the recipe : )


Mix all ingredients together in a bowl, fill your cupcake wrappers with the mix and bake for approx. 15 minutes in a mod-oven. Cooking time may vary, so best just to keep an eye on them and test with a knife - if it comes out clean they are cooked : )


(Now I have a new oven that the temp is always too hot when reading recipes and it seems to cook things faster too ; ) So in my oven I cooked these for approx. 15 minutes at 170 C fan-forced.)


Of course, once I had popped them in the oven Matilda asked if she could lick the bowl and spoon. I was hesitant, what if she tasted the pumpkin and decided that she was 'definitely not' eating those cupcakes. Well, she licked the bowl clean . . .


and when they were cooked? She ate 2 for morning tea . . .


as did Tom . . .


Success!!!


Stay tuned for next weeks recipe : )
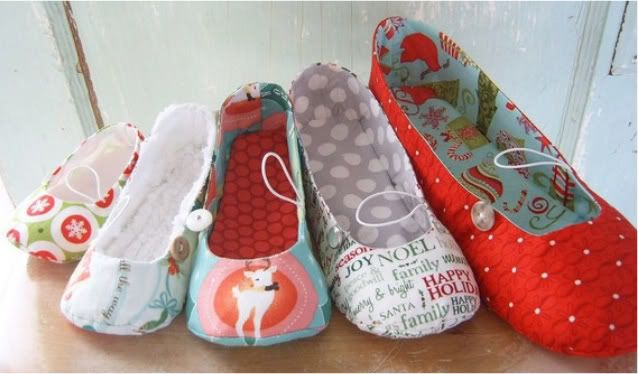
Monday, June 13, 2011

Photo of the Week #11

double rainbow . . .


p.s. finally blogger is working again for me, so it will be back to more regular posting and finally I can actually comment again on other's blogs : )

Monday, June 6, 2011

Photo of the Week #10

my tiny dancer

Monday, May 30, 2011

Photo of the Week #9

it seems our weekends are consumed by the outdoors and weekend gardening at the moment. this is our work-in-progress 'nature trail' at the back of our block where we back onto natural bushland.

Saturday, May 28, 2011

{GRATEFUL} for sleeping babies

Today I am grateful for sleeping babies. In fact, not just today but for the past 5 years! Yes, I have been blessed with 3 happy sleeping babies, much to the disgust of some mothers - my apologies. I don't know what the secret is. They all have their own sleeping styles, upside down, back-to-front, inside out - anywhere on or in the bed they like to snuggle with their favourite blankets or toys. For me it has meant being able to work from home with my 3 little helpers with me each day and for that I am truly grateful being here to share each and every day with them as they grow.


For more grateful blog posts, pop on over here : )

Friday, May 27, 2011

{HANDMADE FINDS} Vintage Baby


pickledparlor on etsy - pinwheels


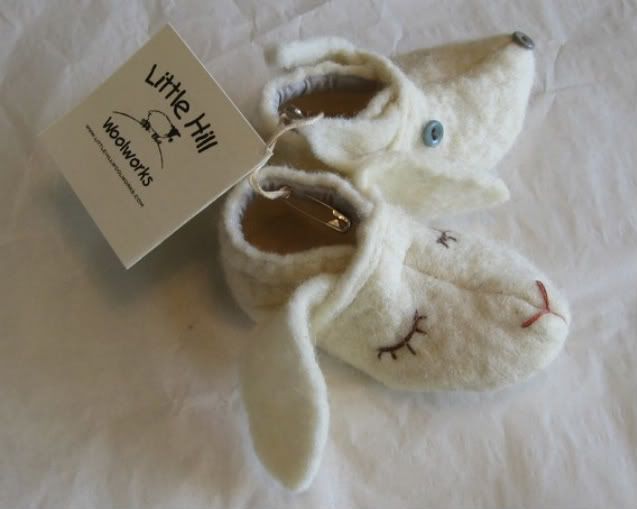
littlehillwoolworks on etsy - sheep & wolf booties


lullabybirds on etsy - baby bonnet


winterpeach on etsy - pdf shoe pattern

Wednesday, May 25, 2011

{WORDLESS WEDNESDAY} Holly Hobbie

my very own little holly hobbie


(professional photo courtesty of Little Fingers Photography & Holly Hobbie image from Photobucket)


more Wordless Wednesday's here : )

Monday, May 23, 2011

{TUTORIAL} Wool Felt Crayon Roll

Materials List: Wool Felt - 2 x pieces: 5 inches x 12 inches (1 x inner layer / 1 x outer layer) & 1 x piece: 3.75 inches x 10.5 inches , Sewing Machine & Thread, Ruler, Scissors, Fabric pen/pencil, 8 Crayola Crayons (standard size). Closing option #1: 1 x Hair Elastic & 1 x Button or Closing option #2: 80cm length of ribbon. Pinking Shears to give your edges are pretty touch (optional)


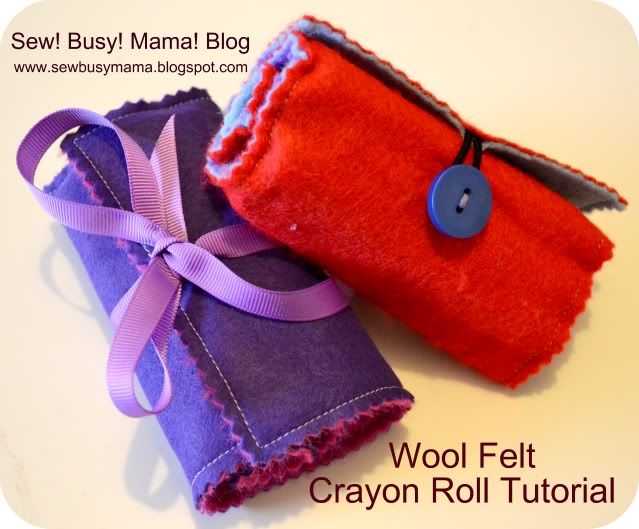
Where to buy Wool Felt? I have a supplier that I have been buying my wool felt from for almost 3 years now. The quality of the wool felt and the customer service is fantastic - store link HERE.
-------------------------------------------------------------------------
Step 1: Mark out with your fabric pencil, 8 even spaces approx. 1.1 inch apart on your smaller piece of wool felt, leaving approx. quarter of an inch at each end. (I have made my markings in pen so you can see them).Step 2: Lay your smaller piece of felt with the marking on top of your inner layer piece of felt in the middle, and lining up the bottom edge, and sew 1/4 inch in from the edge along the bottom edges, to secure these two pieces of felt together, sewing back a few stitches at the beginning and end to secure your stitches.
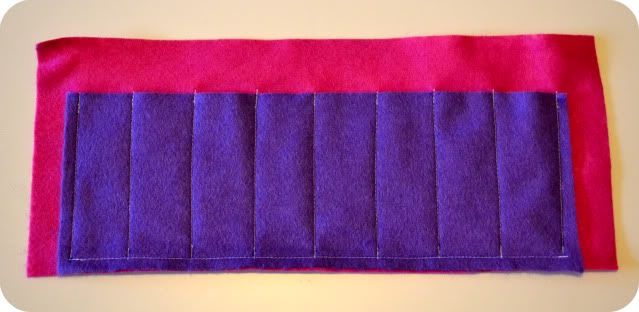
Step 3: Sewing your crayon pockets - starting at your first marking, sew from your bottom sewn line up to the top edge of your small piece of felt, sewing back a few stitches at the beginning and end to secure your stitches. Then move on to your next marking and do the same - until your have sewn up from all your markings and have 8 little pockets for your crayons.
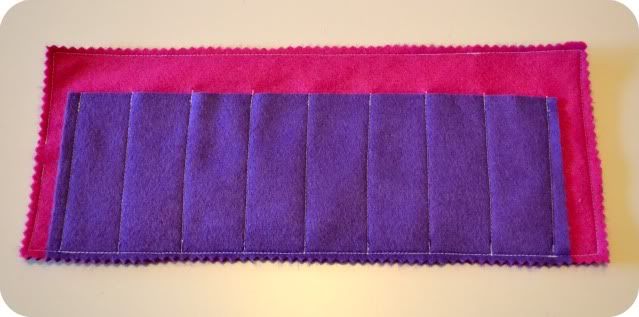
Step 4: Lay this sewn section on top of your outer layer of felt and sew all the way around the edge using a 1/4 seam allowance and leaving a small opening at one end of approx. 1/2 inch.

(Optional) Step 5: Trim all the way around the edge with your pinking shears to make it look pretty.
-----------------------------------------------------------------------

Finishing (Closure #1 - Ribbon):

Step 6: Fold your length of ribbon in half and insert the folded end into your opening of the felt pieces approx. 1/2 an inch and sew over 2 - 3 times to secure.

Step 7: Fill your pockets with your 8 crayons, roll up and wrap the ribbon around and tie with a bow.

--------------------------------------------------------------------------------

Finishing (Closure #2 - Elastic & Button):

Step 6: Insert your hair elastic into your opening of the felt pieces approx. 1/2 an inch and sew over 2 - 3 times to secure.
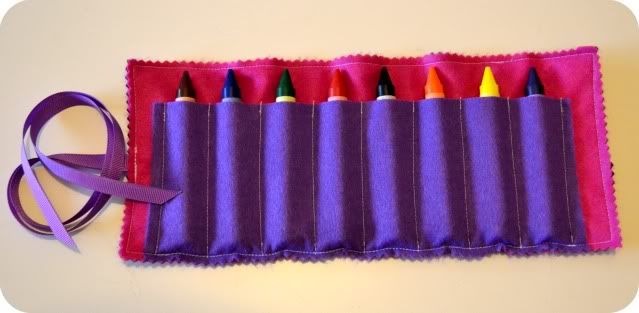
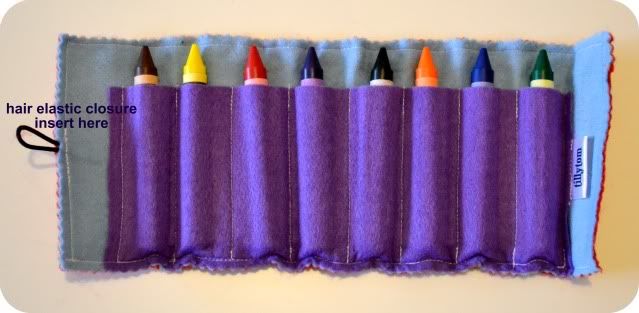
Step 7: Fill the roll with your 8 crayons and roll up. Pull your elastic tie a little to find the right spot to sew on your button to the back of the crayon roll and pop a small mark here with your fabric pencil. Unroll and hand sew your button on being careful not to sew through your pocket layer of felt on the inside of the roll. Roll up your crayon roll and loop your elastic over the button to secure. Your finished! Well done! Any questions with this tutorial please do not hestiate to ask : )

***Copyright note: I am happy for you to use this tutorial to make crayon rolls to sell, but please give credit where it is due by crediting this pattern/tutorial to myself. (i.e. Crayon Roll design/pattern by Sew!Busy!Mama! Blog)***

Happy sewing!

Photo of the Week #8

weekend gardening

Thursday, May 19, 2011

{FAMILY} Photo session . . .

Last month we invited Angela of Little Fingers Photography out to our home to do a family photo session on a Sunday afternoon. Angela has done some fabulous photography for my tillytom label, so after 3 failed attempts due to bad weather and flooding at home, we finally got some fabulous weather, 3 mostly happy children and a puppy dog that just didn't want to miss out on the fun ; )

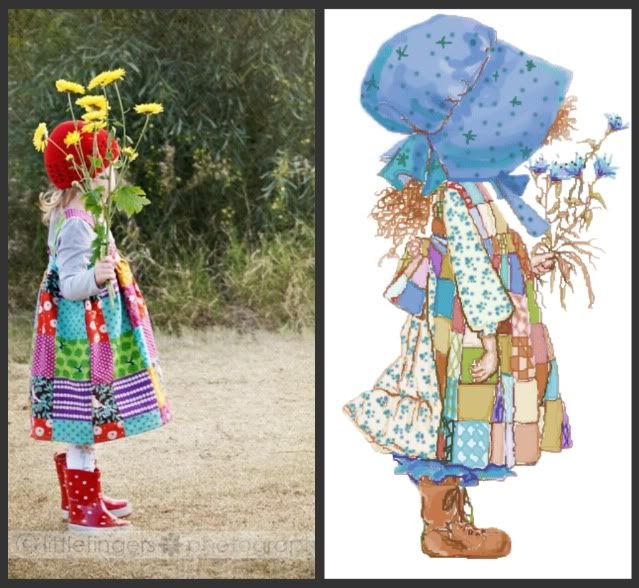
And we couldn't be more pleased with the results! So many precious photos to cherish of our little family, these are just a few favourites.

Wednesday, May 18, 2011

LEGO GIVEAWAY? Yes please!

Posie has the most fabulous giveaway happening on her blog right now for the LEGO fans!


Pop on over to find out more!